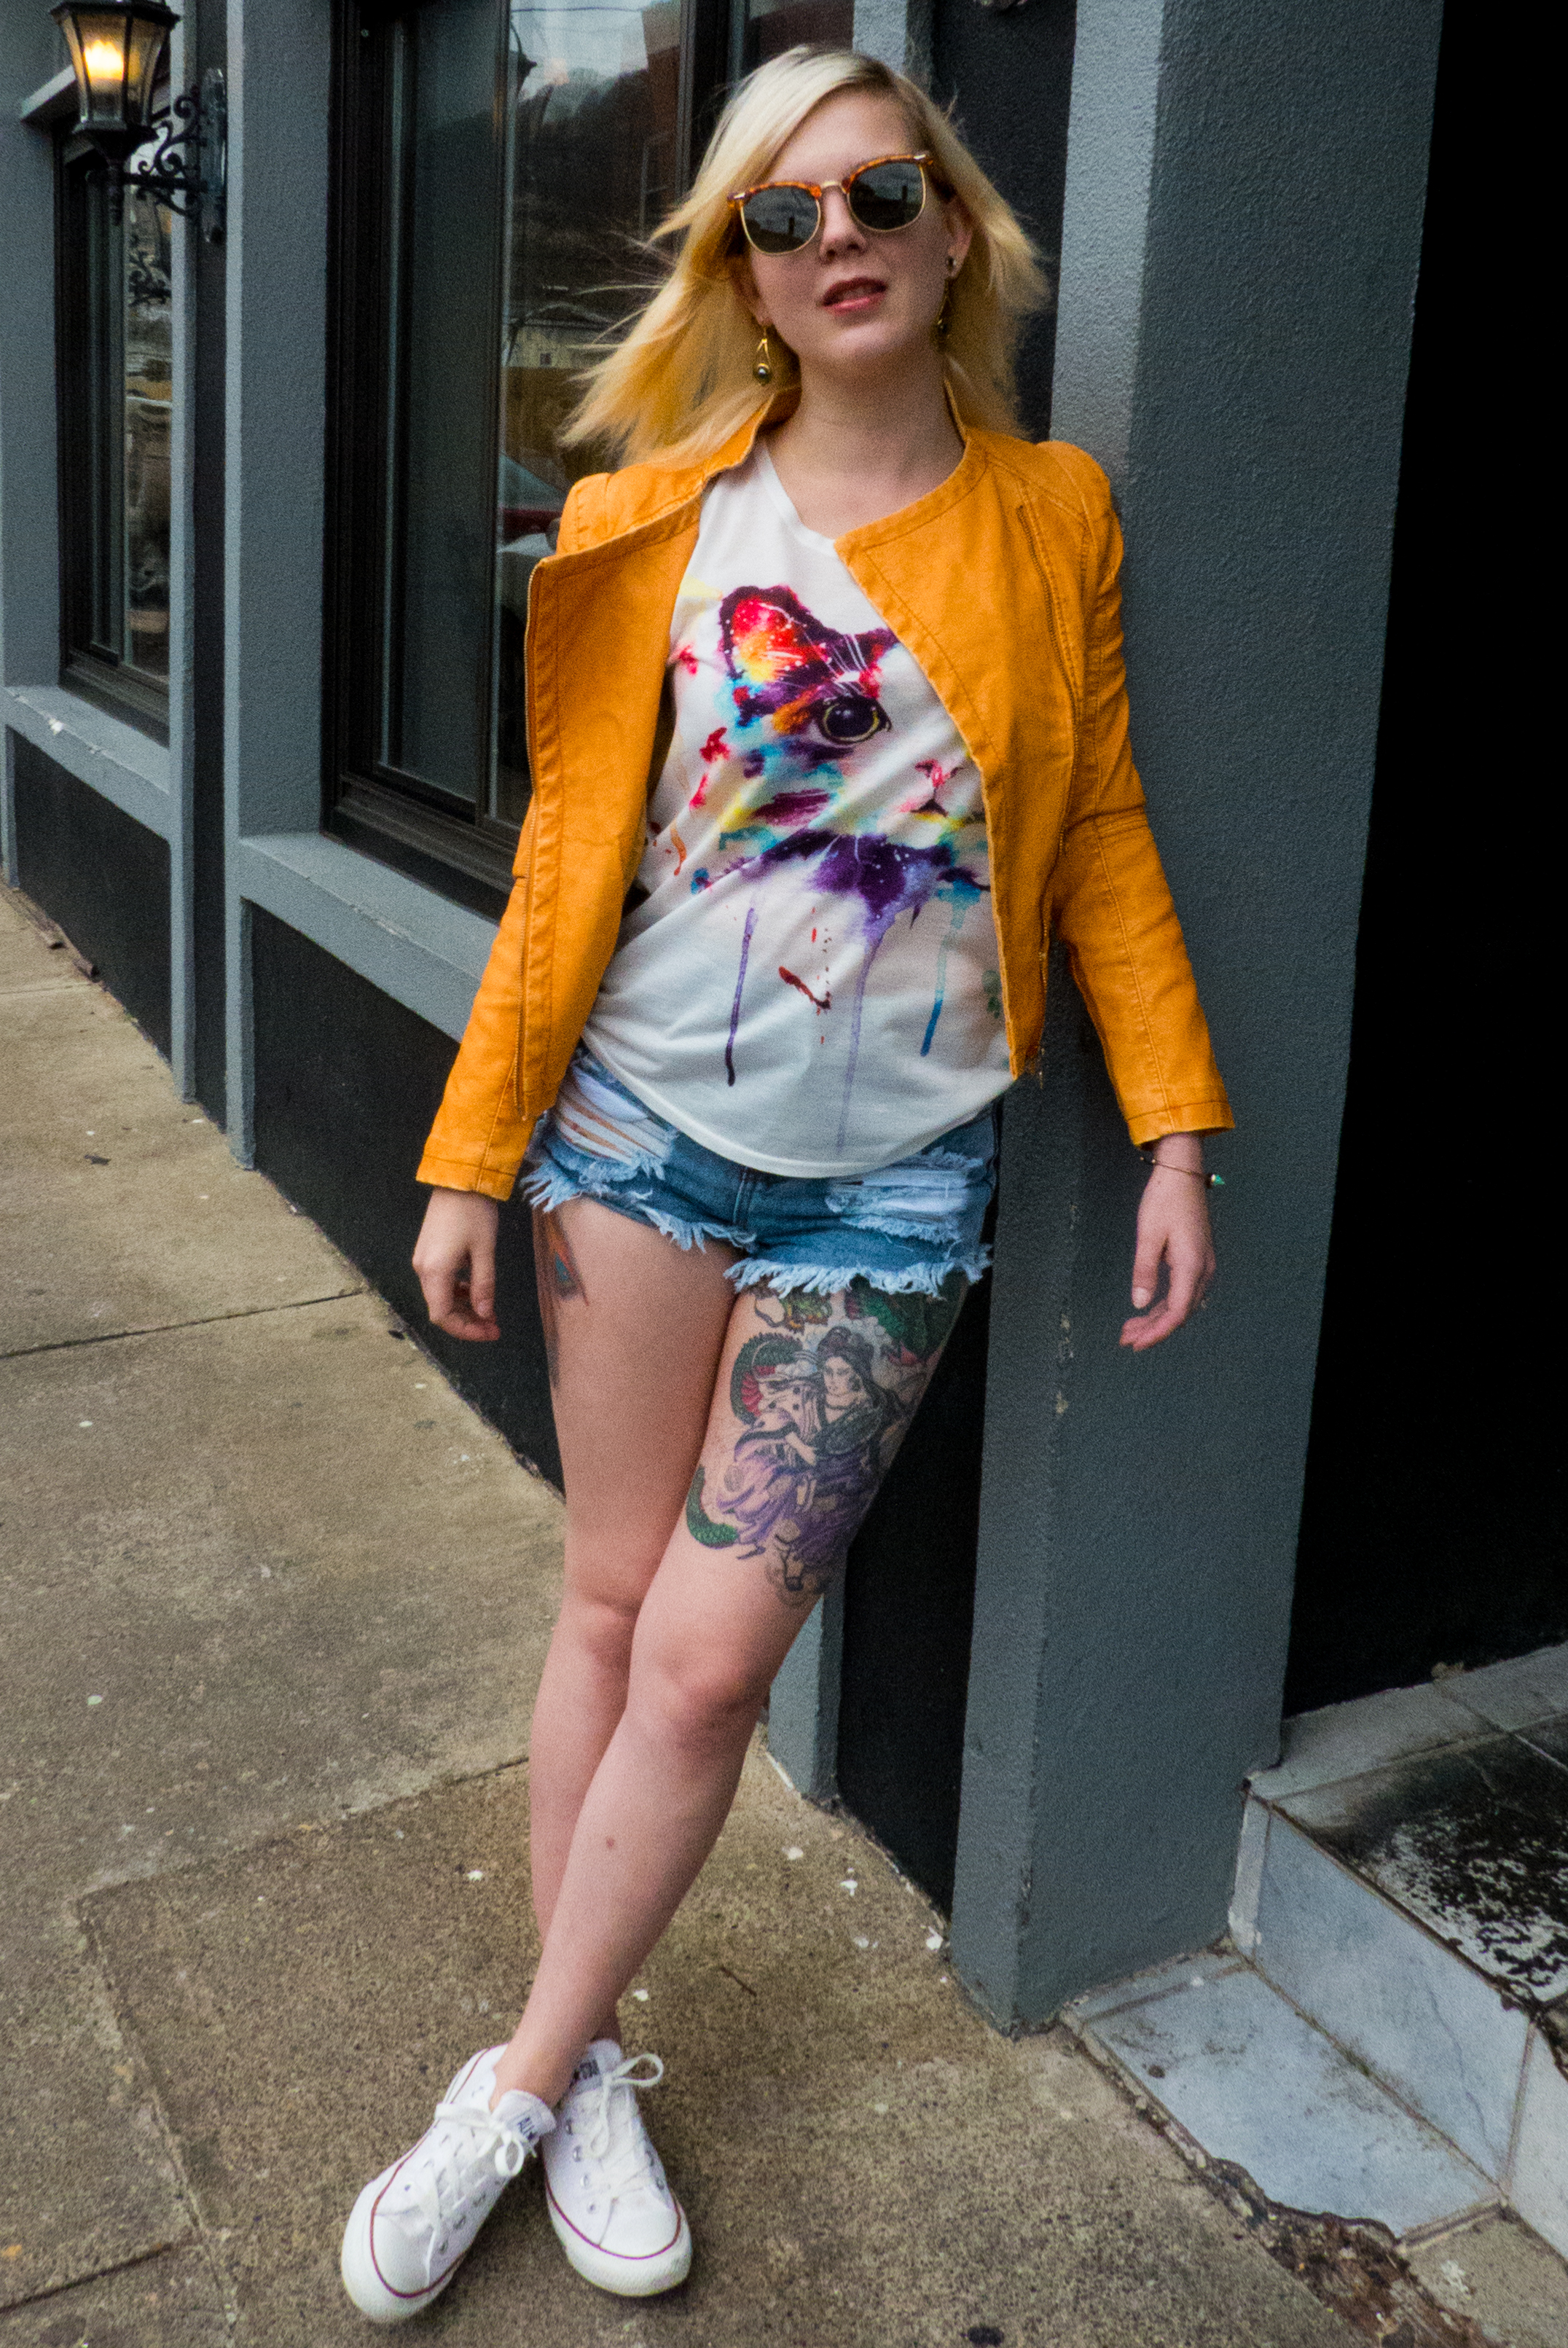
#OOTD: Crazy About Kitties (Feat. Light In The Box + SheIn)

As I've mentioned in some of my past posts, spring has seemingly sprung in the 'Burgh and I am thrilled! This means my second favorite season, summer, is just right around the corner meaning I can partake in some of my favorite activities! Such as basking in the sun down by the point, playing on the river rocks on Northshore (judge me), and of course strolling around the local shops downtown and in Sewickley. So today, I did just that while styling some new spring and summer pieces from my sponsors Light In The Box and SheIn.
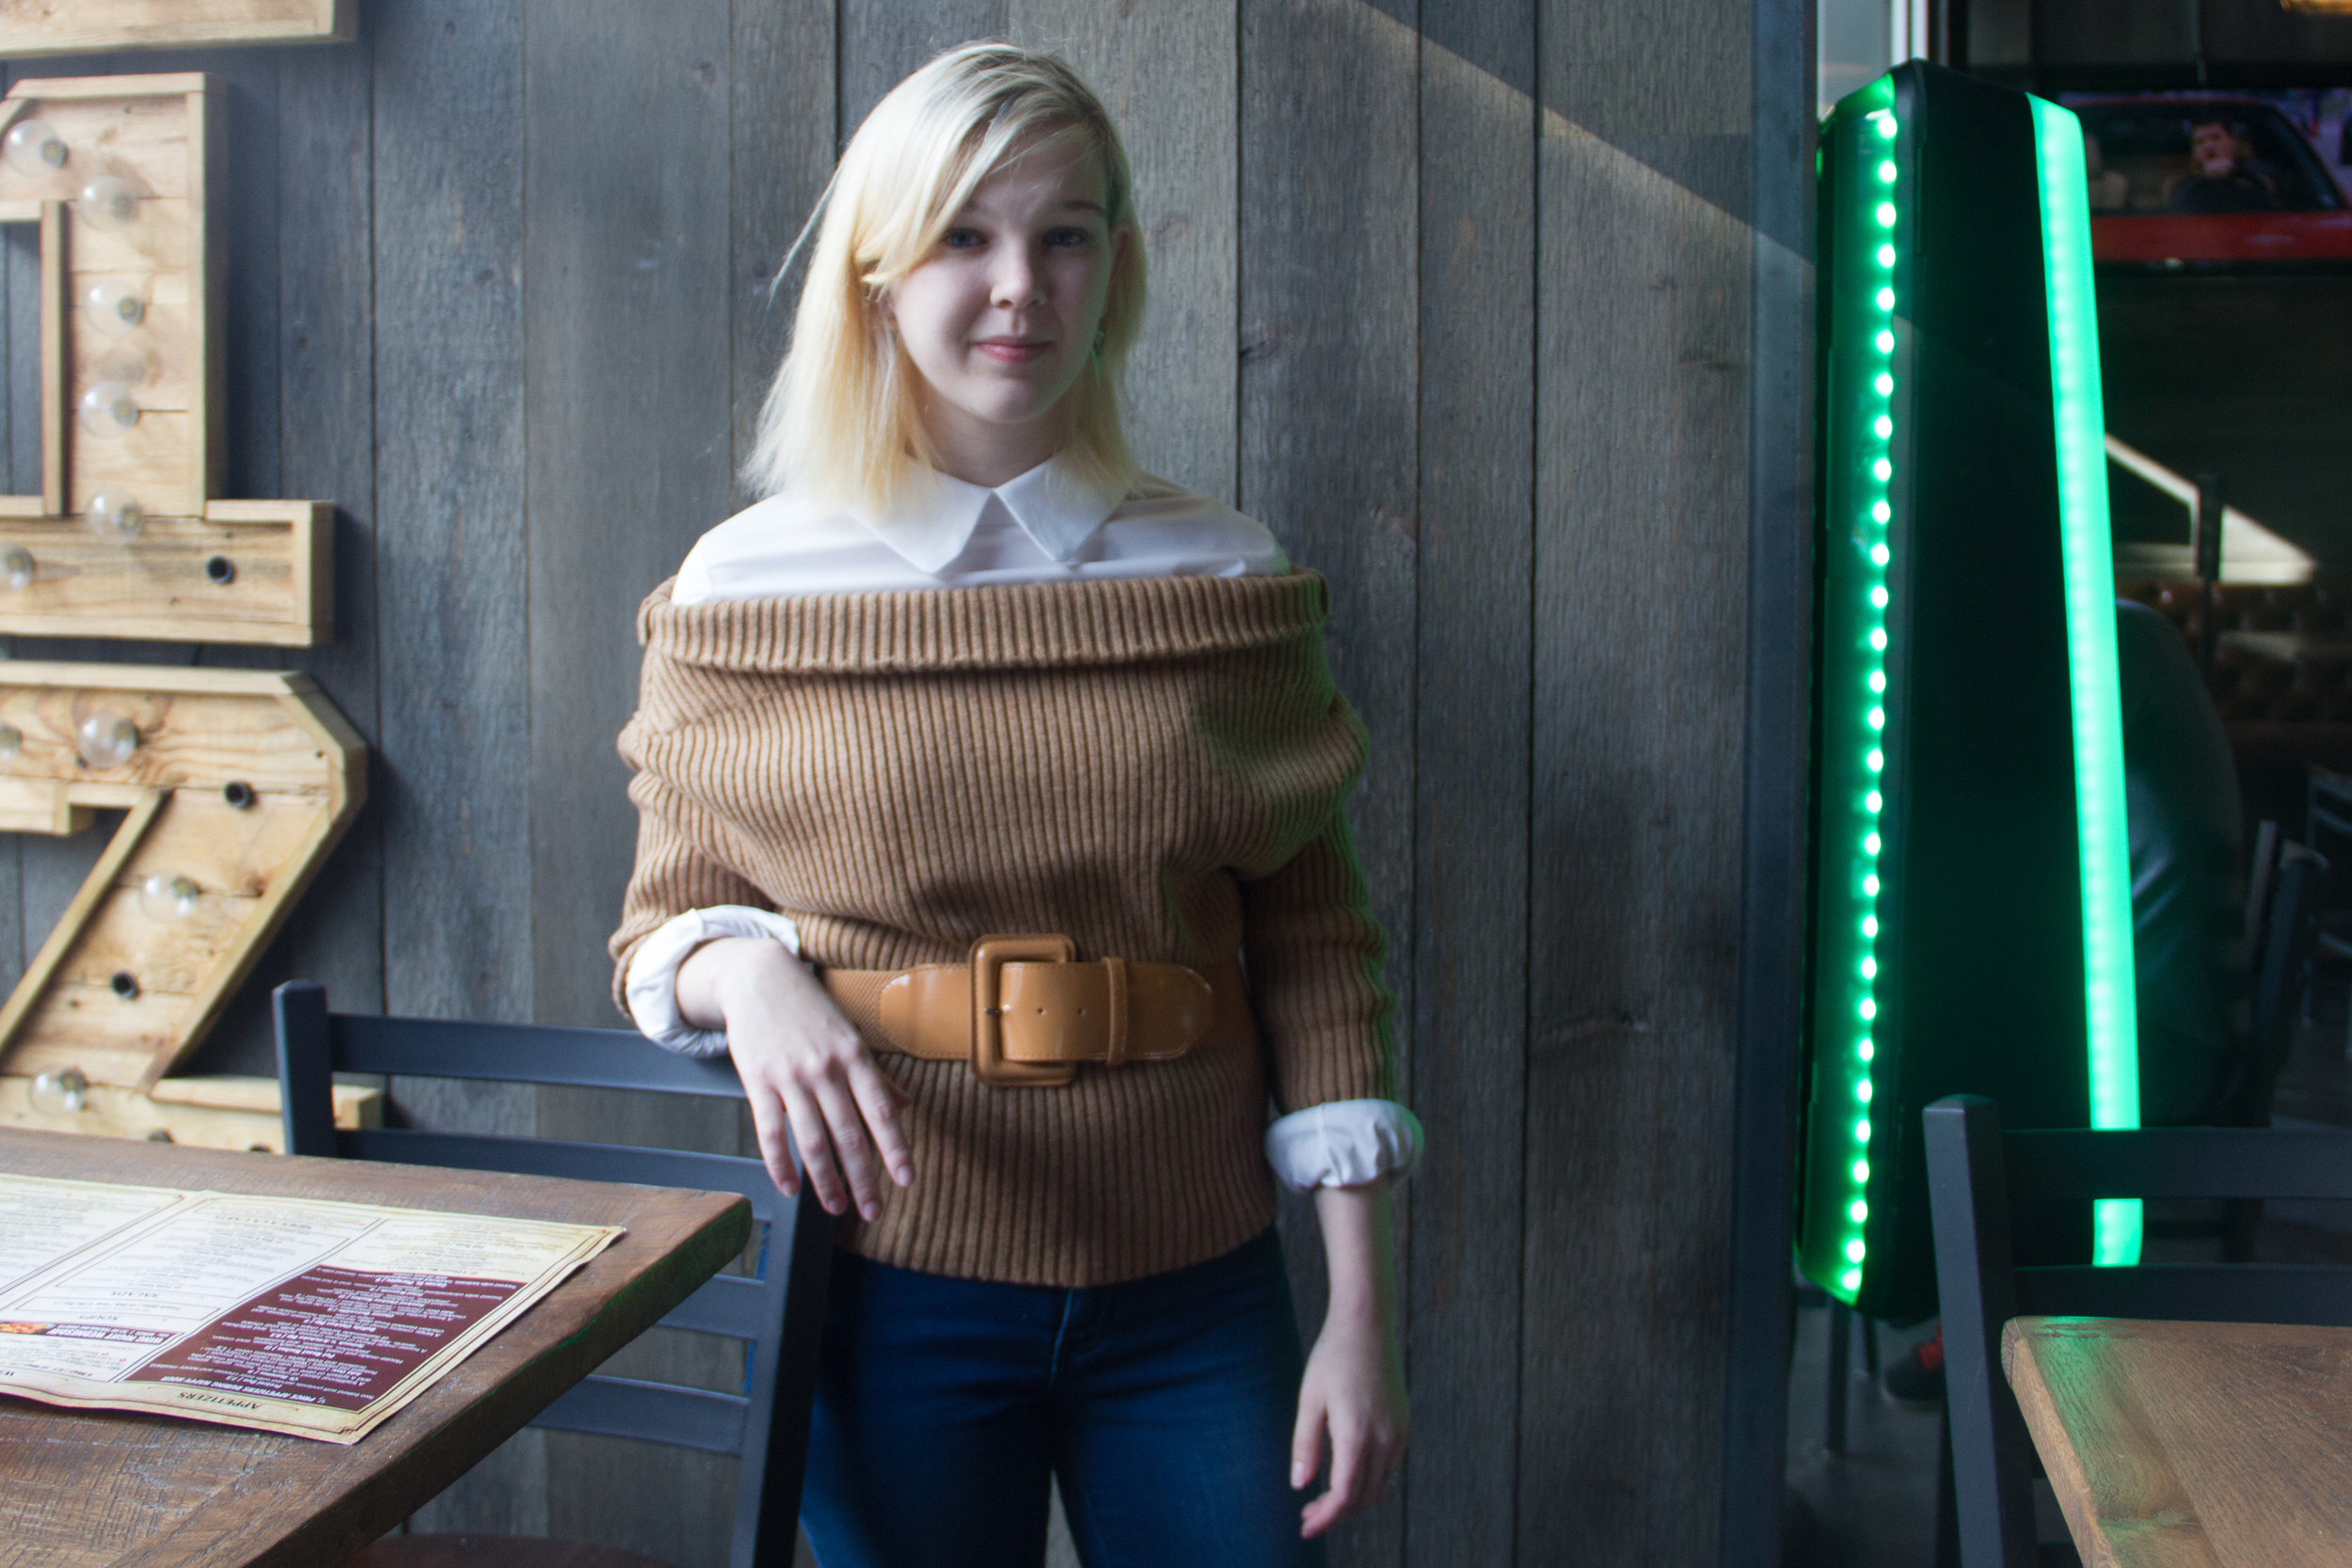
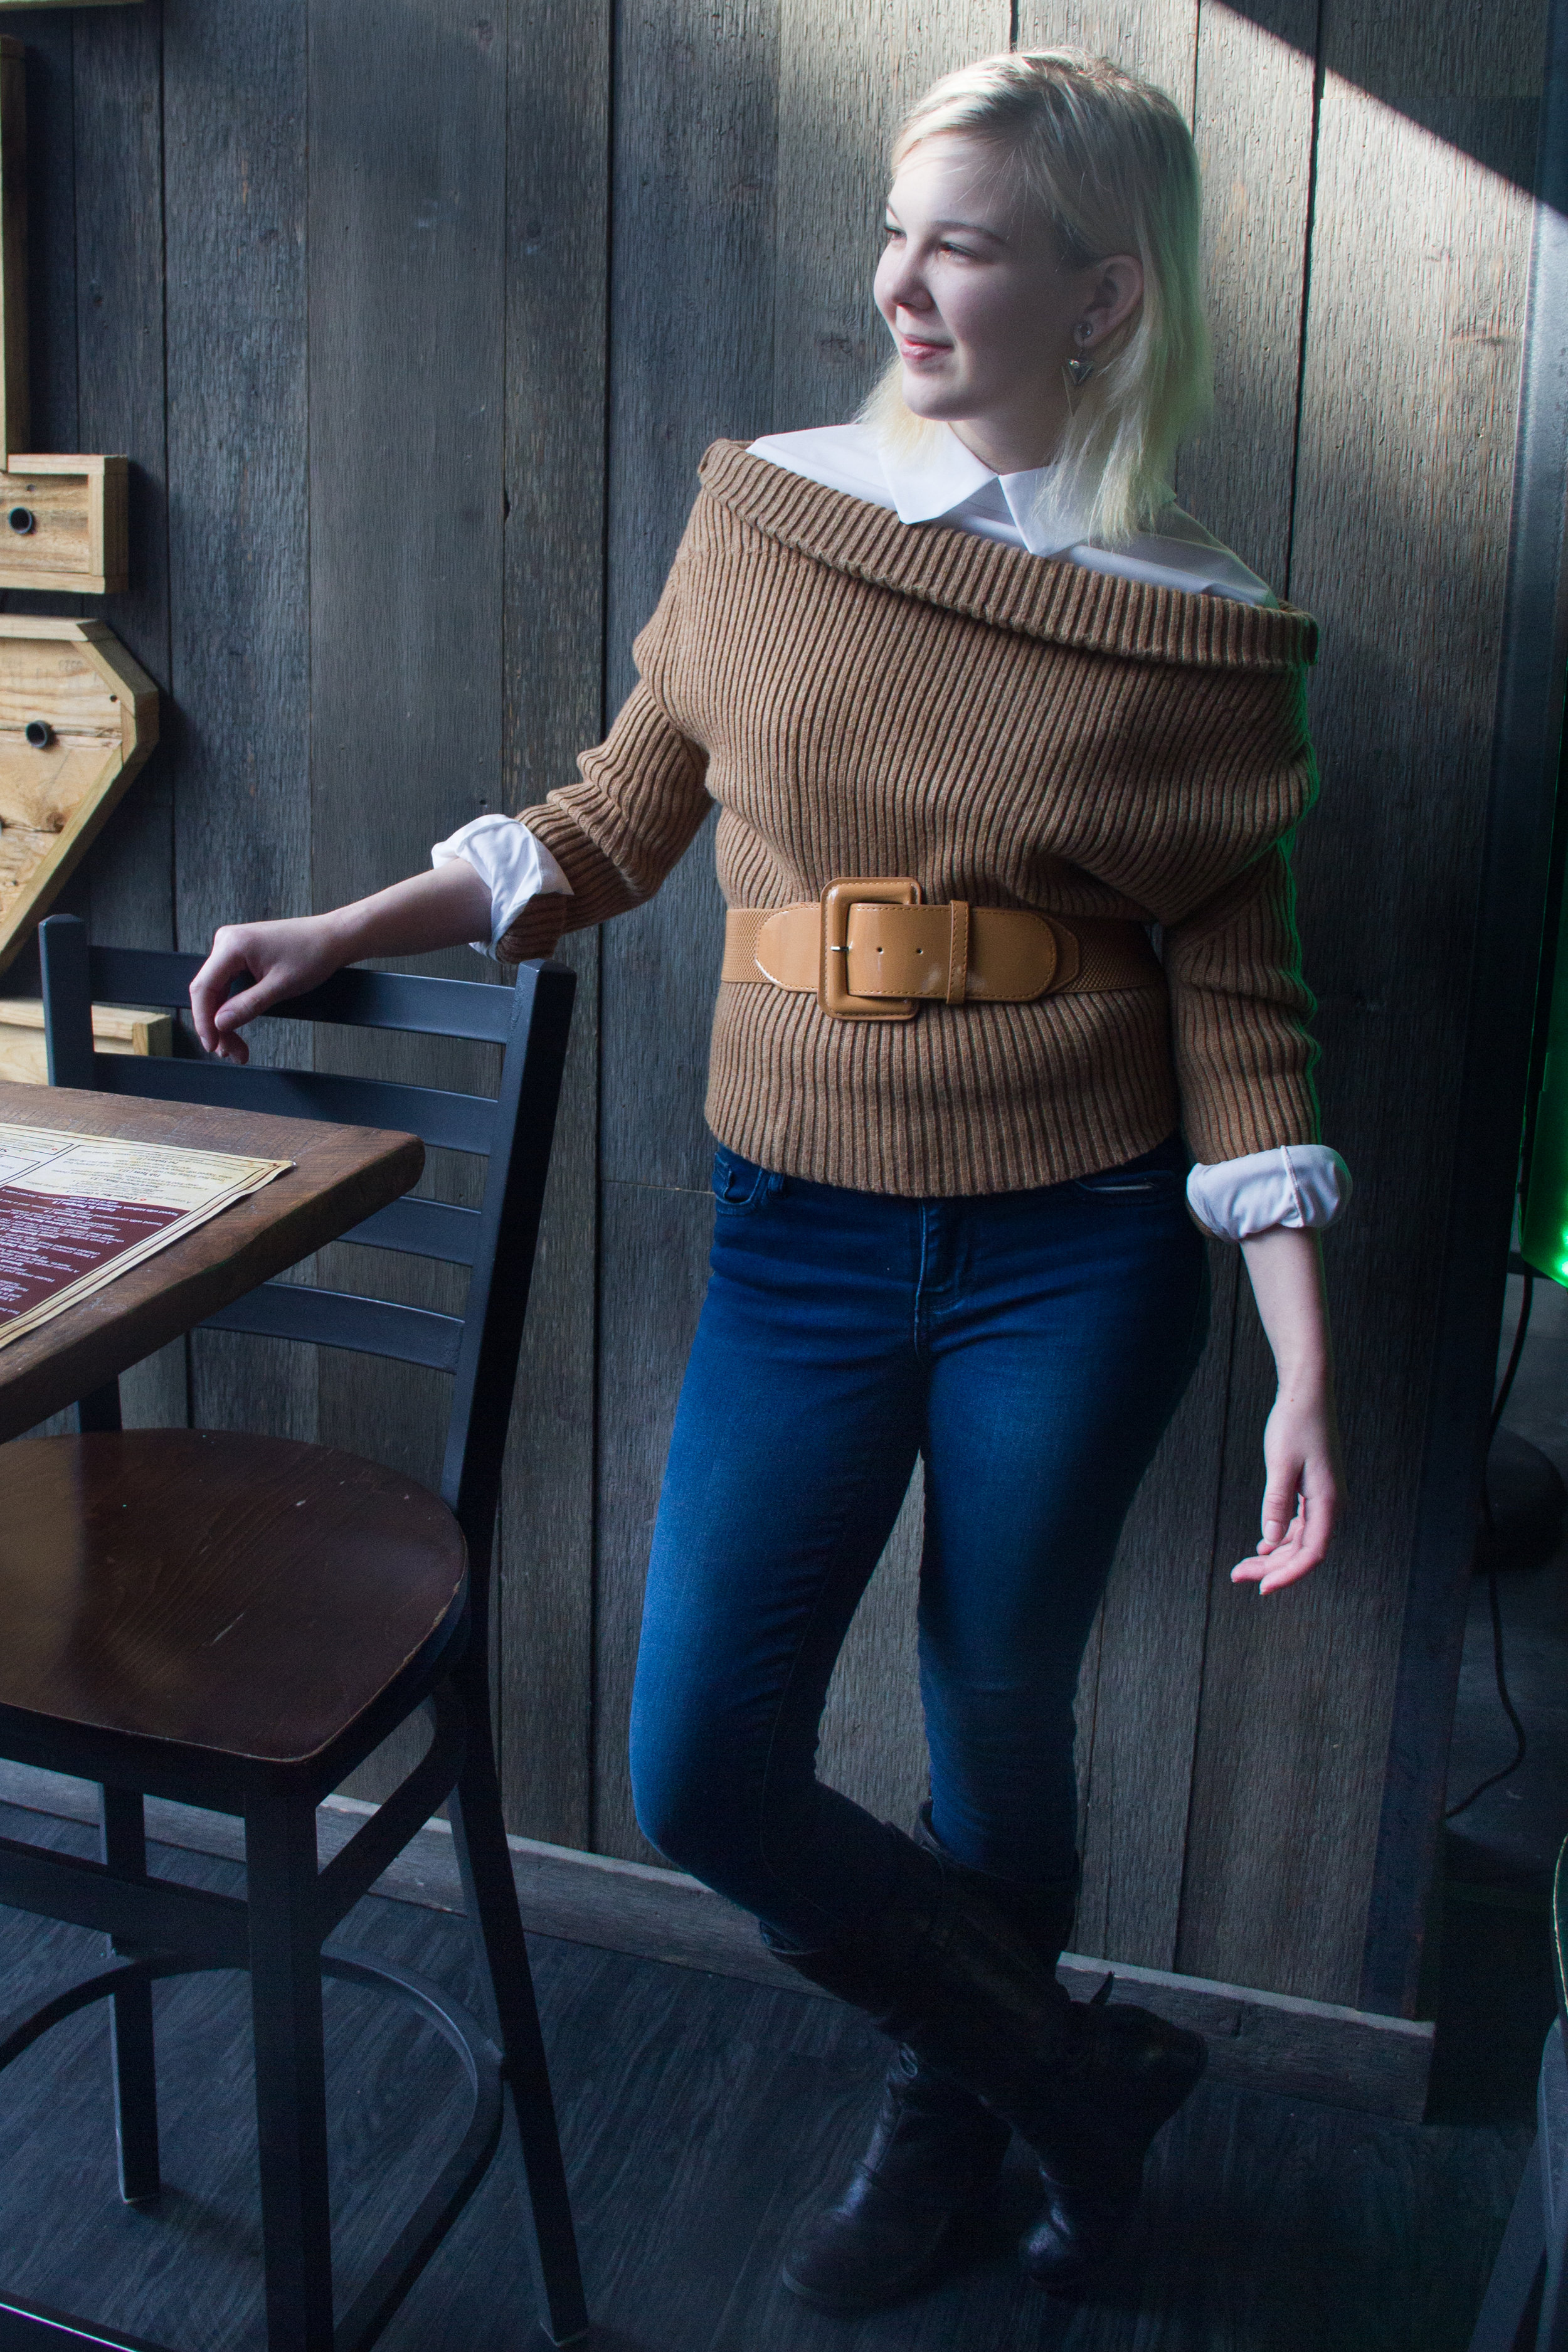
Purrrfectly Poised

Since the weather was absolutely beautiful here today, I decided to celebrate by heading to my favorite suburb, Sewickley. As I'm sure you know from my past posts, downtown Sewickley is full of awesome little shops ranging from clothing to skin care, they even have a doggy bakery so you can stop and get a treat for your four-footed friend! Sewickely also has a ton of awesome places to eat for both lunch and dinner, so today after my shoot, my mum and I decided to grab lunch at the little local pub, Sidelines, and though all of their food is delicious, I gotta say they have the best fries I have ever had!

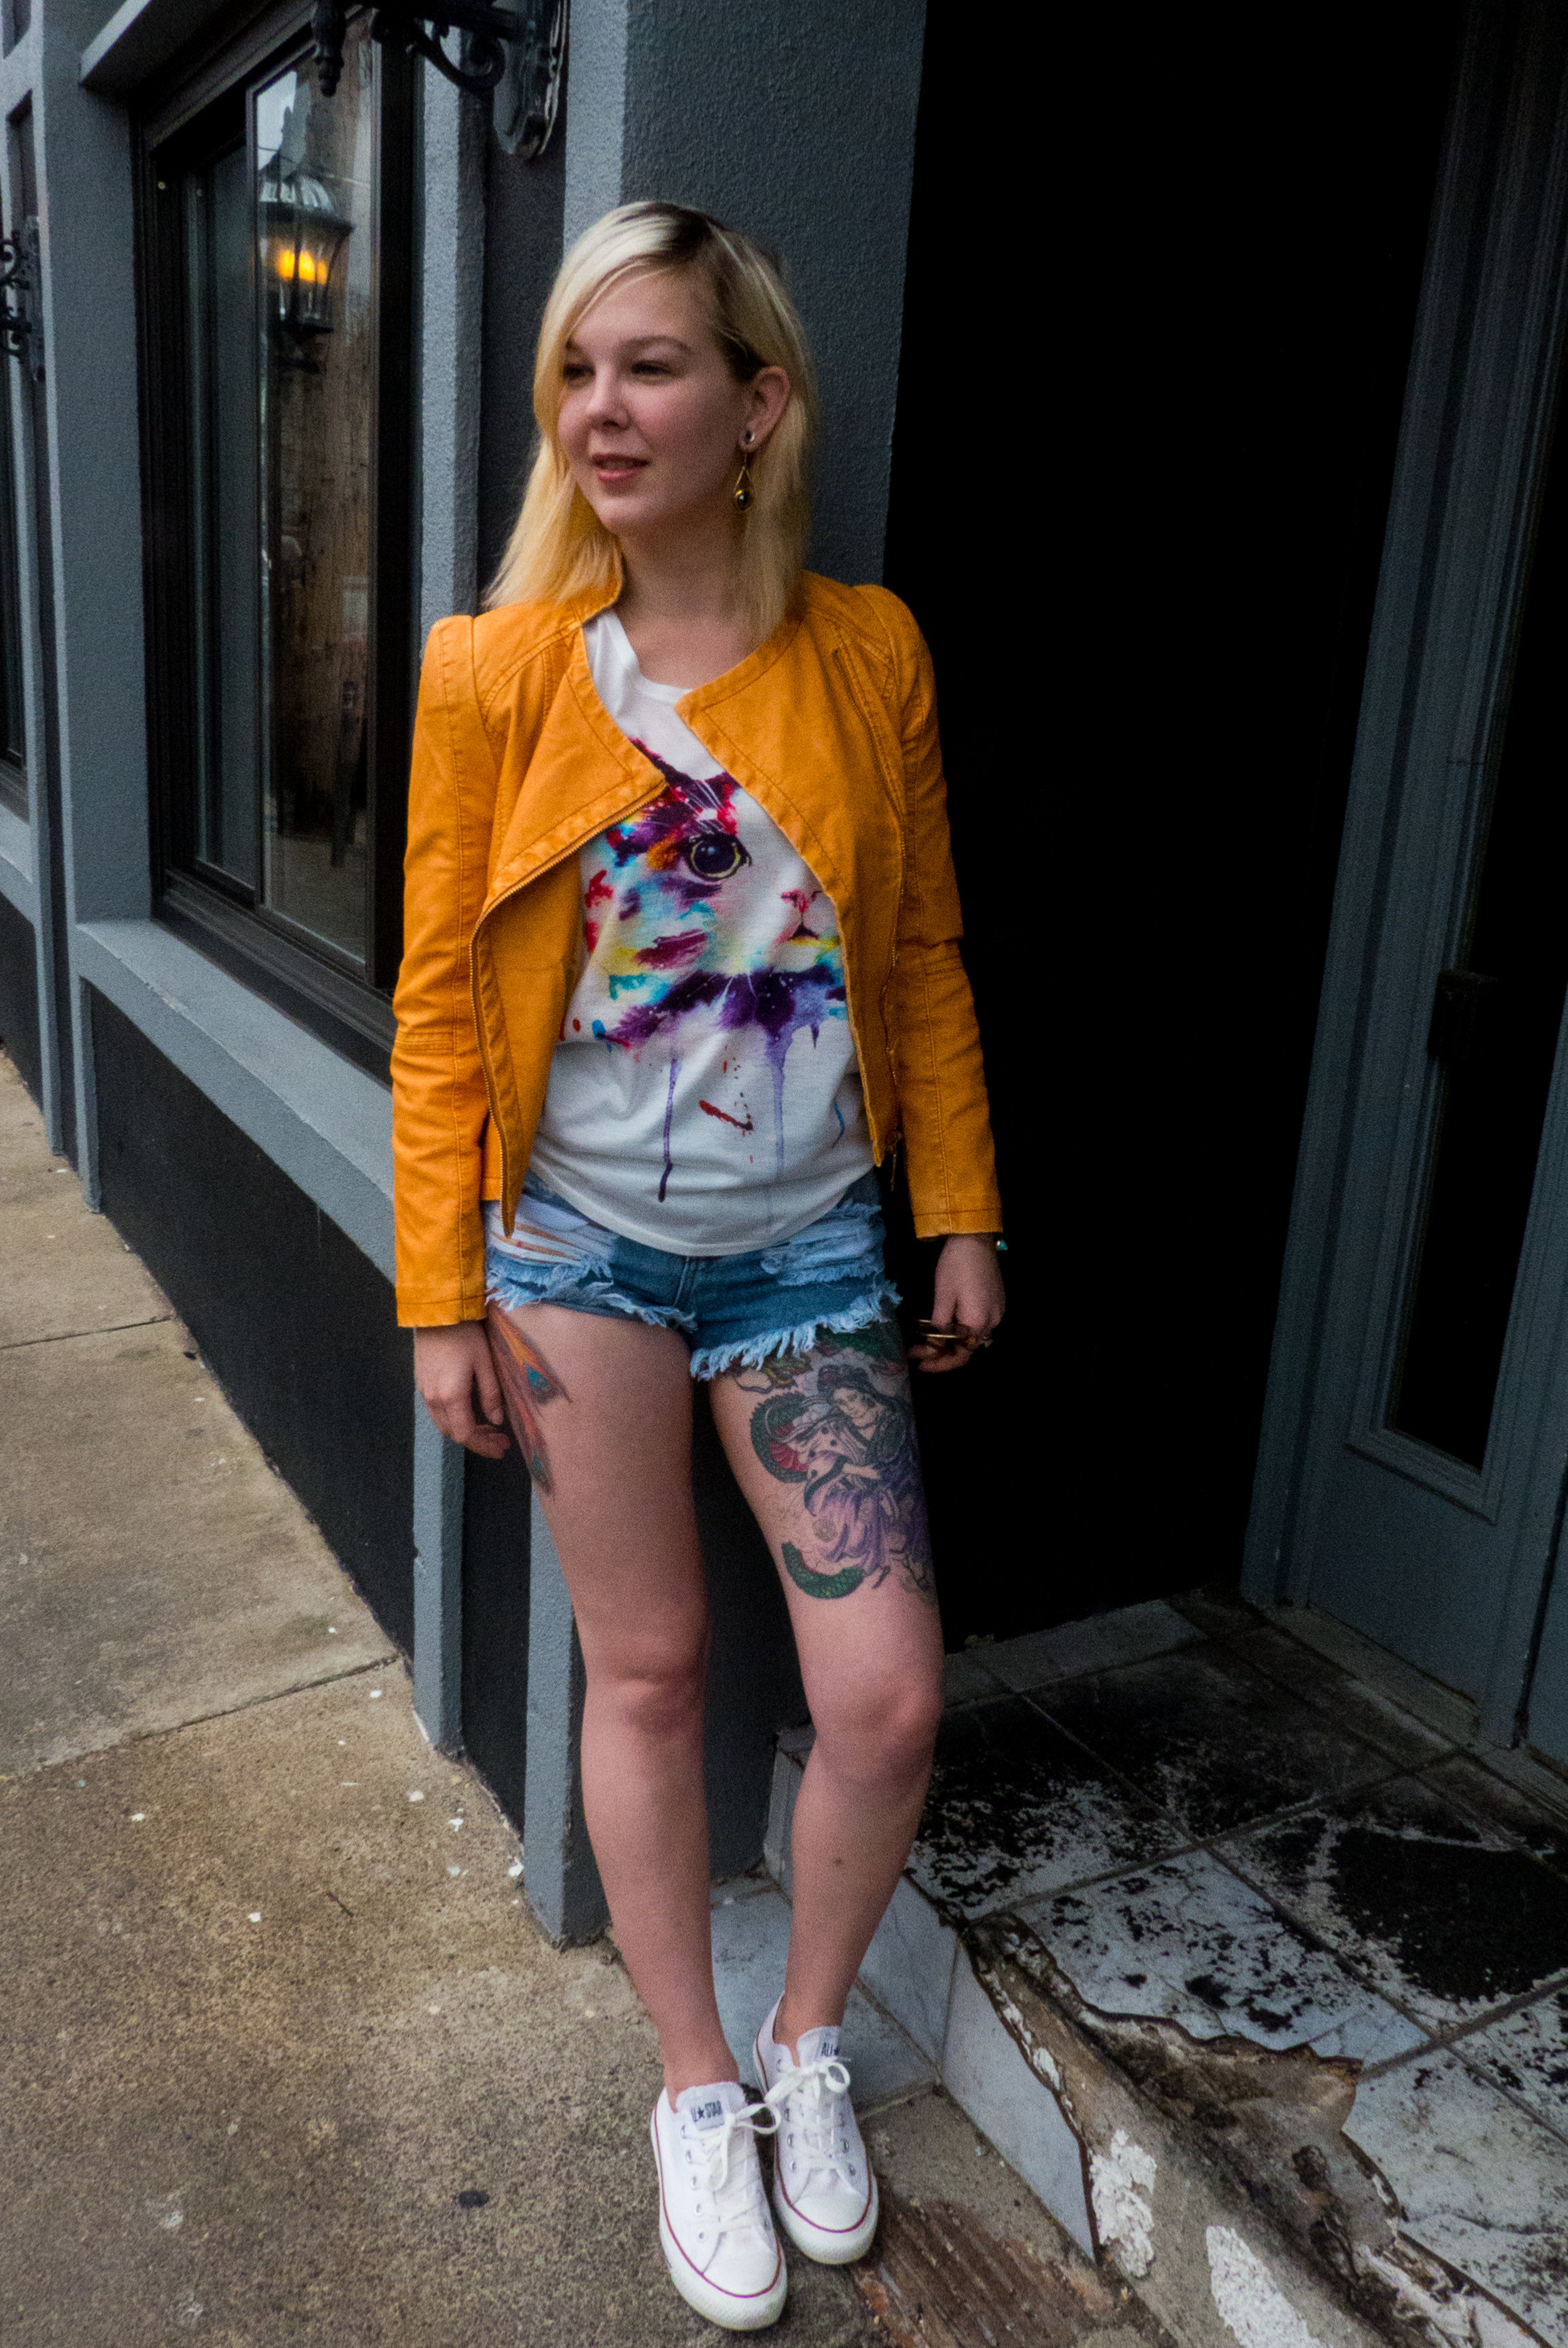
Since the weather was so warm today, though it may be a bit early, I decided to break out my cutoff shorts from SheIn, and paired them with this chic, yellow, leather jacket and adorable cat print tee shirt from Light In The Box. Aside from having a touch of spring fever and wearing some shorts, the reason I chose to style these pieces together is because I love how the yellow jacket and graphic tee complement each other. And to top off this fun, relaxed, spring look, I decided to complete this outfit with a pair of classic white converse.

After wearing this outfit for a day of fun in the sun, I have to say, much like every other article of clothing I have received from both of these company's, each of these pieces are incredibly comfortable and well made. The reason why I chose this adorable tee from Light In The Box, is because if you follow me on Instagram, you know that along with my two pups Rollie and Moses, I also have a Maine coon cat named Lola. And I was just tickled by this particular tee because if Lola were technicolor, she'd look pretty similar to the feline!

Next, the reason why I chose this yellow leather jacket, is because though I have my old faithful black one from Wilson Leather, I figured I needed something a bit lighter for spring, so this jacket was a great addition to my wardrobe! This jacket is also pretty warm for being light weight, which is great for when it gets chilly in the evening. I also chose these shorts from SheIn because I actually only had two pair, and with spending so much time in Florida as well as the weather warming up here, I decided perhaps I should start a new collection for next year before heading back to campus!

One Last Look

Do you also have a case of spring fever, if so how have you been styling for it? Let's chat about it in the comments below or you can tweet me at @StarkRavingChic! Have an adorable, relaxed spring look that you'd like to show off? I'd love to see it! So feel free to tag me in a post or on your Instagram story at @StarkRavingChic. Later, babes!

Xx, Bree

P.S. Also, In case you haven't heard, I am now a proud member of rewardStyle and LIKEtoKNOW.it! Meaning you can shop straight from my Instagram feed when you click here or here. Don't know what LIKEtoKNOW.it is all about? Learn more, here! Or you can check out my up coming post about it, this Wednesday!

Creating an Editorial Calendar for Your Blog

A few posts ago, I celebrated my two year blogiversary and shared with you the top 10 ½  things I have learned during my two years of blogging. After that post, I received loads of positive feed back, as well as questions as to how I do it all. So to follow up and answer those questions, I've decided to share my work process with you all as well as how to make your own editorial calendar. 

So, if you're anything like me, you're constantly working out of at least 20 browser tabs, a yellow legal pad or two, a myriad of Post-it notes stuck around your computer monitor, and you probably have ran out of tabs to color code your calendar with on your phone. To the average person (and definitely to John) this scene looks like nothing more than pure chaos. Though to me, it's an organized system, erm, organized mess--at least that is what I continually tell myself. But nonetheless, it works for me and I never miss a deadline, even if it takes four to six Americanos to make that happen.

However, back when I started Stark Raving Chic in 2015, I wasn't quite as efficient with planning and scheduling for it as I am today, and you're probably wondering how I got here. Well, during my hiatus during the summer of 2016, I did a lot of regrouping and planning, as well as reading tons of articles about blogging productivity. (Which you can have a look at on my Pinterest board, here!) So, during that 6 month break, I learned so much on my own and by talking with other bloggers online. (One of the best people I got advice from is Brittany, of the blog Thrifts & Threads, I highly suggest you check out her "blogging tips" section.) And one of the things I have learned, and that has honestly been the biggest help to me, is how to make and keep an editorial calendar, which I'm now going to share those steps with you!

First Things First: What is an editorial calendar?

An editorial calendar is more than just a calendar. You see, an editorial calendar helps you develop a blogging strategy. It allows you to set your goals and achieve them seamlessly as well as acting as a great organizational tool. Keeping an editorial calendar is a great marketing strategy due to the fact it makes your blog work for you instead of you working for it. By having an editorial calendar, you have all of your posts for an extended period of time, all laid out and scheduled ahead of time, for instance, I have posts ready to go all the way through the beginning of June. So by having all these things ready to go in advance, this puts less stress on you so you can pursue even more projects and collaborations, which really strengthens your brand. This also helps your business because it attracts new collaborators, builds relationships, and helps you get more recognition.

Step One: Set Your Blogging Schedule

When setting up your editorial calendar you need to decided how often you are going to generate new content. For me, I post roughly 2-4 times a week, but that is just due to the amount of sponsored posts and affiliates that I have, not to mention that I have the time to post at that rate. So my advice is to be realistic with your blogging schedule, for instance, if your schedule is hectic and you do not have the time to post daily/weekly, it is better to post consistently twice a month than posting every day one week followed by three months of silence. There are plenty of successful blogs that only post once or twice a month, and that’s because they do it consistently. Every. Single. Month.

Step Two: Identify Who You Are Blogging For

I’m going to make this easy and give you the answer: you are blogging for the readers within your blogging niche. Sure, of course you enjoy blogging for yourself, but to have a successful blog (which I honestly feel that is what most people set out to have when starting a blog) you have to keep in mind what your audience wants as well as the audience you want to have. For instance, if you have a monthly column (mine used to be "Wish-list Wednesdays") and you notice that your readers are getting bored with it, you then know it is time for a change or your readers will drop like flies and you won’t hook any new subscribers. So your job as a blogger is to keep engagement within your niche, so therefore you need to blog for your readers, and keep them interested.

Step Three: Determine Your Blog Categories

I actually did a post featuring some of my own changes involving this last month, and I can’t stress to you enough how important it is to set your categories, considering this is a key element of being successful within your niche. If you are anything like me, you probably already have blog categories, but they were probably randomly assigned based on whatever post you wrote at that time. To set your categories the right way, you need to start from scratch and determine the best categories for your niche. For example, I split up Stark Raving Chic into nine core categories that I cover here which would be, Personal Style, Style Guides, Beauty, Lifestyle/Travel, Blog Life, Interviews, Events, Miscellaneous, and Look Book. The reason I chose these specific categories is because they blanket many of the tags that I use, and because these nine things are what my blog is most known for, in that specific order.

So to successfully categorize your blog, you need to brainstorm 5-10 solid categories that you blog about consistently and that your niche has an interest in. For example, if you are strictly a beauty blogger, some categories you should have are a personal look book, client look book, makeup tutorials, product reviews, hair and skin care. The reason I list these categories is because though they are pretty broad, they are still specific to your niche and brand.

Step Four: Brainstrom Blog Post Ideas + Evaluate Upcoming Post Deadlines

Before you can actually create your editorial calendar, you need to brainstorm 5-15 post ideas (depending on how often you post to your blog) that you would like to cover on your own, as well as posts that you have to write on a deadline such as collaborations and sponsored posts. How I do this is I decide what topics I would like to cover within the next 3 months, as well as what ongoing sponsored posts and collaborations I have going on. I then come up with titles for the deadline posts and schedule them accordingly with their deadline, and then I think of topics I would like to cover in between.

During this step in the process, don’t hold back and write down any possible ideas so that you have some variety to work from, for example, here are some posts in my drafts right now:

  • Easter Sunday style guide

  • Light In The Box + SheIn sponsored OOTD

  • StyleWe OOTD

  • LIKEtoKNOW.it User Guide

  • Easter Sunday Style Guide

  • A Day Downtown

  • Metisu OOTD

  • Soufeel Post

  • Easter OOTD

  • Coachella Style Guide

  • Spring cleaning series (3 posts)

  • Fourth of July party planning DIY

  • SPOILER ALERT

[Show]

Notice that these blog post ideas are not necessarily about my brand, but provide useful information to my readers and stand out within my niche which can attract new readers. (Especially if they’re interested in my *spoiler* point.) The reason this is, is because many people in my audience are my age, so they will be searching for cute outfit ideas for concerts this season, and people are always looking for party planning inspiration, therefore, for my fellow American readers, I will be doing a lifestyle post about fourth of July party ideas. So when people google these topics, they will land on my blog, discover all the info I share and potentially come back and read more!

Step Five: Identify Holidays + Events (AKA Personal Days)

This is where you determine what and when to post special topics to your blog. For instance, around Christmas time many people are interested in holiday themed posts. So if you are a lifestyle or fashion blogger like me, you’ll want to make sure that you have Christmas or other holiday related posts on your blog in December. You also want to take life events into account too, such as vacations. For example, if you will be away for an extended period of time (think back to my hiatus in 2016) you want to let you readers know that you are on a trip or will be absent for an extended period of time for whatever reason and let them know when you will return. The reason you want to do this is, is because if you simply go silent, people might be confused as to why you are not posting and just assume you have quit your blog, which in turn could cost you audience members.

Step Six: Putting Your Editorial Calendar Together

Now that you have organized your blog, brainstormed your post ideas, and now have the dates you would like to post your article in order, it’s time to put everything together and make your editorial calendar! First grab a physical calendar, planner, or your phone/tablet and bring up your calendar app.

Start by filling in you sponsored posts that are on a deadline, considering these posts should be your high priority posts. Next, fill in any of the posts that you chose to keep from your brainstorming session, though these are not as high of a priority as your deadline posts which are the backbone of your blog, these posts are the extra hooks you need to reel your readers back in. After you have those posts scheduled, you then want to schedule any upcoming holiday posts or make any notes of possible vacations or time away from your regular blogging schedule.

While you are organizing these posts, make sure to mix up the blog categories and types of posts to add variety. For example, you might have an outfit of the day post, followed by a product review, followed by a list of favorite life hacks for storing and organizing you clothing.

As I stated earlier in this post, I like to schedule posts 2-3 months in advance. This is because it gives me enough structure to keep my blog running smooth, but also enough flexibility to move posts around as needed. You’ll find a balance that works best for you the more you use your editorial calendar, but to start with I suggest only schedule on month of blog posts, until you get the hang of it!

Step Seven: Write Your Blog Posts

Now that you have organized your posts and have their dates set, it’s time to write your posts! Due to the amount of posts I do per week, I generally write 4-5 posts in advance. However, if you are only posting once a week or biweekly, I would suggest writing at least two of your blog post as a start. Most blogging platforms, like Squarespace and WordPress, let you draft and schedule posts in advance, so write and schedule your two most pressing blog posts on the days you marked on your editorial calendar, and there you have it, you successfully used an editorial calendar!

Step Eight: Consistently Check + Update Your Editorial Calendar

Lastly, in order for your editorial calendar to work, you need to keep up with it. To do this, you will need to check and update your calendar on a daily basis. For me, I check mine daily and update it about twice a week or as I complete and publish scheduled posts. The reason this is important is because this is the key thing that will keep you organized while using an editorial calendar. So, when you come up with new post ideas, schedule them as needed!

And in order to keep your post schedule running smoothly, set aside some time once a week to write and schedule a couple more blog posts for publication. And honestly, some days you’ll feel like writing more than others, and that’s okay. But my advice to you is, when you get into your blogging zone, write as many posts as you can, it’ll be totally beneficial in the long run and make less stress for you later!

What are somethings that you do to keep your blog posts organized and running smoothly? Do you keep an editorial calendar? Let's chat about it in the comments below or you can tweet me at @StarkRavingChic! Have an awesome blogging tips post yourself? Feel free to tag me in the comments of it's corresponding Instagram photo at @StarkRavingChic, because I would love to check it out. Happy blogging, babes!

Xx, Bree

#OOTD: Pub Crawl Pizzazz (Feat. StyleWe + SheIn)

One of my favorite things about Pittsburgh is all of its local pubs and eateries. I'm not talking the big chains that I have been known to frequent such as Houlihan's or Primanti's (though the latter is a total staple of the 'Burgh) but the smaller places ranging from The Library, The Micro Diner, and my favorite little place, Hollywood Cafe, which I talked about in yesterday's post.

Well, the little pub I enjoyed lunch at today is no different and is right in the heart of Pittsburgh's North Shore, across the street from PNC Park. This gem, is called The Local Brewhouse, and it is also affiliated with one of the 'Burgh's other popular restaurants, Local. And I have to say, this little joint will be somewhere I will be frequenting because not only is it just a short walk across the bridge from my college, Point Park University, it is also only one block away from my favorite spot in Pittsburgh: The Andy Warhol Museum.

Enjoy A Pint

As I said earlier, after a very busy morning of running errands and photographing for my internship with CollegeFashionista, I actually had a leisurely afternoon ahead of me. So since it is Friday after all (TGIF!) I decided to just kick back and enjoy my lazy afternoon, and stopped by this cozy little bar for a pint and some food. (The Greek salad I had was delicious by the way!)

For my day out and about downtown, I decided to wear one of my very versatile pieces, but style it for a more casual look. I'm sure many of you are thinking "Gee that sweater and belt look awfully familiar." and that's because they are! You see, the sweater is actually the top half of a dress that I received from my sponsor StyleWe earlier this year, and have since styled the top and bottom together as well as separately on a few occasions! Much like I said in the original post, the reason why I love this dress is because it truly is a piece that just keeps on giving.

To style this chic but casual outfit, I decided to stay true to the top's kicked back style and simply style it with some dark blue skinnies that I got from my sponsor, SheIn, topped off with my trusty knee high boots. The reason why I made these simple style choices, is because for one, it was a bit chilly out today and I did want to keep warm, but also because I love how effortless, yet put together this outfit looks. I also have to say, that these jeans from SheIn are giving my favorite Levi's a run for their money, because they are so comfortable.

To put the finishing touches to this outfit, I decided to pair this sweater with a basic white blouse. (Okay, it's actually this blouse, so it's not quite plain, but hey it works!). The reason why I chose to layer the sweater with this blouse is because I like the bit of contrast it adds to the sweater and adds some extra polish to the piece. Then to further style this look, I chose to pair this ensemble with my Jenny Bird Flagstaff Earrings, compliments of Rocksbox.

One Last Look

What are some of your favorite local pubs and eateries? I'd love to try them out! So let's chat about it in the comments below or tweet me about it at @StarkRavingChic! Have a picture of one of your favorite local spots? Feel free to tag me in a post or in you Instagram story at @StarkRavingChic. Later, dolls!

Xx, Bree

P.S. Psssssst! If you love the jewelry I styled in this post as much as I do, you can try Rocksbox for a whole month 100% FREE when you sign up using my promo code "starkravingchicxoxo". Don't know what Rocksbox is or how it works? You can learn more here!

Also, In case you haven't heard, I am now a proud member of rewardStyle and LIKEtoKNOW.it! Meaning you can shop straight from my Instagram feed when you click here or here. Don't know what LIKEtoKNOW.it is all about? Learn more, here!